PXE/BINL - AN05: Windows Network Image Capture & Deploy
Starting an automated network image Capture and Deploy of WDS OSs, taking no more than 15 minutes and a ~4 MB download.
The objective of this document is to show you how to network image a reference PC installed with a WDS OSs (MS Vista and up) and later network deploy the previously captured image to any target PC. It is all based on Serva's new Task Sequence Engine (TSE) not requiring to follow cryptic procedures nor being dependant on Microsoft’s WDS/WAIK/ADK suites.
Procedures described in this document require Serva "Pro"
Serva PXE/BINL - Application Note Set
PXE/BINL - AN01: Windows Network Install - Basis
PXE/BINL - AN01.1: Windows Network Install - WDS OSs
PXE/BINL - AN01.2: Windows Network Install - RIS OSs
PXE/BINL - AN02: Windows Network Install (Adv) & WinPE Boot
PXE/BINL - AN03: Non-Windows Network Boot/Install
PXE/BINL - AN04: Custom menu
PXE/BINL - AN05: Windows Network Image Capture & Deploy
PXE/BINL - AN06: Windows Network Image Capture & Deploy on ARM
0 Index
- Requirements
- Overview
- Sysprep
- Windows PE
- Capture & Deploy
- Automation
- Advanced
- Troubleshooting
- Final Words
1 Requirements
1.1 Required Software
1.1.1 Microsoft Windows Serva 5.0.0 "Pro" or higher.
1.1.2
Reference PC.
1.2 Assumed knowledge
1.2.1 PXE/BINL - AN01: Windows Network Install - Basis
1.2.2 PXE/BINL - AN01.1: Windows Network Install - WDS OSs
1.2.3 PXE/BINL - AN02: Windows Network Install (Adv) & WinPE Boot
2 Overview
In this chapter we explore Serva's capabilities emulating WDS/MDT capture & deployment features as an extension of the concepts developed in PXE/BINL - AN02: Windows Network Install (Adv) & WinPE Boot
2.1 Procedure:
Let's consider you have a reference PC that has been customized with software and settings, and you would like to take an image of this PC and later apply it to other PCs. The Reference system must be first generalized using Sysprep by removing computer-specific information such as installed drivers and computer security identifier (SID), etc. Next you should net capture the image of the Reference PC into a WIM file which will be stored in Serva repository. Later on this image can be offered for network deployment to different target PC systems.
3 Sysprep
To capture a Windows image, you have to first generalize the installed image. Even if you're capturing an image that's going to be deployed to a PC with similar/identical hardware, you still have to generalize the Windows installation to remove unique PC-specific information from a Windows installation, which allows you to safely reuse your image.
When you generalize an image, Windows replaces the computer SID only on the operating system volume where you ran Sysprep. If a single computer has multiple operating systems, you must run Sysprep on each image individually.
Please generalize your reference PC as explained here:
Sysprep (Generalize) a Windows installation
4 Windows PE
4.1 Auxiliary network bootable executive: Windows PE.
The process of network capturing and network deploying a PC image with Serva will require network booting a Windows PE executive.
4.1.1 Creating a Windows PE executive.
The Windows Assessment and Deployment Kit (ADK) includes the CopyPE and MakeWinPEMedia command line utilities. When run from the Deployment and Imaging Tools Environment, CopyPE creates a working set of WinPE files that MakeWinPEMedia can later use to create bootable WinPE media. MakeWinPEMedia creates bootable WinPE ISOs containing the required Windows PE executive (boot.wim).
>copype amd64 C:\WinPE_amd64

>MakeWinPEMedia /ISO C:\WinPE_amd64 C:\WinPE_amd64\WinPE_amd64.iso
After creating WinPE_amd64.iso you can mount it or open it with 7zip and extract the Windows PE executive file \sources\boot.wim
4.1.2 Repurposing a Windows PE executive
Instead of creating your own boot.wim as described in 4.1.1 you can easily repurpose one taking it i.e. from a Windows install ISO. The needed Windows PE executive will be also found at
\sources\boot.wim.
4.2 Network Booting the Windows PE executive.
Please proceed as explained in PXE/BINL - AN02: Windows Network Install (Adv) & WinPE Boot
i.e. creating the \WinPE_64 Head Directory and copying the following files:
C:\SERVA_REPO\WIA\WDS\WinPE_64\boot.wim
C:\SERVA_REPO\WIA\WDS\WinPE_64\boot.sid
C:\SERVA_REPO\WIA\WDS\WinPE_64\ServaAsset.inf
[PXESERVA_MENU_ENTRY]
asset = Catpure & Deploy

[SERVAPENET]
EndProcess = *TaskSeqSelector
Since Serva 4.0.0 ServaAsset.inf is also parsed for WDS assets. Now we can define not only the name of the WDS asset displayed on Serva's menu but also trigger the injection of ServaPENet when booting stand-alone Windows PE executives. In this case when ServaPENet finishes its job is able to launch an external or internal command. In the example avobe ServaPENet is instructed to finish by executing an internal command (*TaskSeqSelector) that will display a Task Sequence Selector at the netbooting PC.
Now when restarting Serva its BINL service will:
- Parse \WDS\WinPE_64 detecting that you are offering for network boot a stand-alone Windows PE executive (boot.wim).
- Parse ServaAsset.inf knowing that:
- You defined the asset name.
- ServaPENet must be injected into boot.wim.
- ServaPENet must end its job at the booting client by invoking its "Task Sequence Selector"
When Serva's BINL service finishes you should see:
In the previous directory structure we see:
- \$OEM$ directory ready to hold OEM drivers and custom components being injected into boow.wim. Identical to the one used in PXE/BINL - AN01.1: Windows Network Install - WDS OSs
- \Images directory ready to hold your captured and/or offered PC images (usually WIM or FFU files).
- \Logs directory ready to hold Log files from remote PCs being captured or imaged.
- \TaskSequences directory ready to hold your set of Task Sequence command (*.cmd) and/or powershell (*.ps1) files and associated components if any.
| Notes |
|---|
|
5 Capture & Deploy
Microsoft Windows 10 presents the classic 4 partition type schema.
System - Reserved - Primary - Recovery.
![]()
Fig 1: System (UEFI) - Reserverd - Primary (Windows) - Recovery (winre.wim).
5.1 Single Partition Capture & Deploy
This method will capture & deploy the Primary partition (Windows), re-create the System, and Recovery partition types and leave empty the Reserved partition.
This method allows:
1) Deploy to different sizes of hard drives and the Windows partition expands/contracts accordingly to the destination disk size.
2) Modify the captured Primary image with Dism.exe
This method requires:
1) The presence of the
\Windows\System32\Recovery\Winre.wim in the Primary partition in order to recreate the Recovery partition.
5.1.1 Capture Task Sequence.
Let's write a Capture Task Sequence in a command file i.e.:
@ECHO OFF
ECHO [TS] Serva Pro Task Sequence: Image Capture
ECHO [TS] Image_Capture.cmd - v1.3 - Demo purposes
ECHO [TS] NOTE: ServaPENet login with R/W rights on WIA_WDS_SHARE required!
SET /P CONT="[TS] Would you like to continue (y/n):"
IF "%CONT%" NEQ "y" GOTO END

:: ===== The Script begins here ===\\

:: -- Task Sequence Variables --\
:: DISKPART TARGET DISK
SET TARGET_DISK=0

:: SET THE LABEL OF THE WINDOWS VOLUME BEING CAPTURED HERE
SET WINVOLUMELABEL="Windows"

:: SET THE FILE DATA OF THE IMAGE BEING CAPTURED HERE
SET IMG_FILE=Windows10Pro64.wim
SET IMG_NAME="Windows 10 Pro"
:: -- Task Sequence Variables --/

:: :: ::
:: Environment variables defined by ServaPENet
:: Variable:  Local Content:     Pointing to Serva Repository:
:: DEV_NAME   P:                 WIA_WDS_SHARE\<Head_Directory>
:: TS_DIR     P:\TaskSequences   WIA_WDS_SHARE\<Head_Directory>\TaskSequences
:: IMG_DIR    P:\Images          WIA_WDS_SHARE\<Head_Directory>\Images
:: LOG_DIR    P:\Logs            WIA_WDS_SHARE\<Head_Directory>\Logs
:: :: ::

:: == Check Serva repository R/W access ==
CALL :ReadOnlyDir %IMG_DIR%
IF %ERRORLEVEL% NEQ 0 (
ECHO [TS] ERROR: User does not have Writing Rights in Serva's repository.
PAUSE
GOTO END
)

:: == Find Windows volume letter ==
CALL :GetVolumeLetter WINVOLUMELETTER %TARGET_DISK% %WINVOLUMELABEL%
IF %ERRORLEVEL% NEQ 0 (
ECHO [TS] ERROR: Couldn't find OS Volume labeled %WINVOLUMELABEL%.
PAUSE
GOTO END
)
:: Alternative Manual definition
::SET WINVOLUMELETTER=C

:: == Optimize the image to reduce booting time of the applied image  (Optional) ==
:: ECHO Starting image optimization...
:: Dism /image:%WINVOLUMELETTER%:\ /optimize-image /boot

:: == Capture the Primary partition (Windows OS) ==
IF NOT EXIST %IMG_DIR%\%IMG_FILE% GOTO STARTCAPTURE
ECHO Warning: File %IMG_FILE% exists
SET /P OVERWRT="Overwrite (y/n):"
IF "%OVERWRT%" NEQ "y" GOTO END

:STARTCAPTURE
ECHO Starting capture...
Dism /Capture-Image /ImageFile:"%IMG_DIR%\%IMG_FILE%" /CaptureDir:%WINVOLUMELETTER%:\ /Description:%IMG_NAME% /Name:%IMG_NAME%

:END
ECHO Shuting down in
CALL :Delay 5
Wpeutil Shutdown
EXIT /B %ERRORLEVEL%
:: ===== The Script ends here ===//

:::::::::: LIBRARY FUNCTIONS :::::::::::::::::::

::: GetVolumeLetter <OUT_VOLUMELETTER> <IN_TARGET_DISK> <IN_VOLUMELABEL> ::::\\
:: It returns the letter of the first Volume found
:GetVolumeLetter
FOR /F "tokens=3,4" %%A IN ('^( ECHO select disk %~2 ^& ECHO list volume ^) ^| diskpart ^| find ^"%~3^"') DO (
  SET %~1=%%A
  EXIT /B 0
)
EXIT /B 1
::: GetVolumeLetter <OUT_VOLUMELETTER> <IN_TARGET_DISK> <IN_VOLUMELABEL> :::://

::: ReadOnlyDir <IN_DIR> ::::::::::::::::::::::::::::::::::::::::::::\\
:: It returns %ERRORLEVEL% == 0 if IN_DIR is R/O
:ReadOnlyDir
2>nul rename %~1 %~nx1
EXIT /B %ERRORLEVEL%
::: ReadOnlyDir <IN_DIR> :::::::::::::::::::::::::::::::::::::::::::://

::: Delay <IN_SECS> :::::::::::::::::::::::::::::::::::::::::::::::::\\
:Delay
IF NOT EXIST %SYSTEM32%\timeout.exe GOTO STARTCMDTIMER
timeout /t %~1
EXIT /B 0
:STARTCMDTIMER
SETLOCAL EnableDelayedExpansion
SET /A delay=%~1-1
FOR /f %%a in ('copy /Z "%~f0" nul') do set "Newline=%%a"
FOR /L %%i IN (%delay%,-1,0) DO (
SET /p "= Delay          !Newline!" <NUL
SET /p "= Delay %%is!Newline!" <NUL
ping -n 1 -w 1000 192.168.255.0 > NUL
)
ECHO:
SETLOCAL DisableDelayedExpansion
EXIT /B 0
::: Delay <IN_SECS> ::::::::::::::::::::::::::::::::::::::::::::::::://
| Note |
|---|
| For capturing system with customized partitions please read Capture and apply Windows, system, and recovery partitions then create the corresponding Image Capture task sequence |
Let's copy the task sequence script file to:
C:\SERVA_REPO\WIA\WDS\WinPE_64\TaskSequeces\Image_Capture.cmd
5.1.2 Deploy Task Sequence
Let's write a Deploy Task Sequence in a command file i.e.:
@ECHO OFF
ECHO [TS] Serva Pro Task Sequence: Image Deployment
ECHO [TS] Image_Deployment.cmd - v1.2 - Demo purposes
SET /P CONT="[TS] Would you like to continue (y/n):"
IF "%CONT%" NEQ "y" GOTO END

:: ===== The Script begins here ===\\

:: -- Task Sequence Variables --\
:: IMAGE TO DEPLOY
SET IMG_FILE=Windows10Pro64.wim

:: DISKPART TARGET DISK
SET TARGET_DISK=0

:: DISKPART CONTROL FILE (Alternative to in-file parameters)
:: SET DPCF=W10_UEFI_DISK0.txt

:: -- Task Sequence Variables --/

:: :: ::
:: Environment variables defined by ServaPENet
:: Variable:  Local Content:     Pointing to Serva Repository:
:: DEV_NAME   P:                 WIA_WDS_SHARE\<Head_Directory>
:: TS_DIR     P:\TaskSequences   WIA_WDS_SHARE\<Head_Directory>\TaskSequences
:: IMG_DIR    P:\Images          WIA_WDS_SHARE\<Head_Directory>\Images
:: LOG_DIR    P:\Logs            WIA_WDS_SHARE\<Head_Directory>\Logs
:: :: ::

:: == Script protection ==
:: We protect Task Sequences that call "diskpart" from accidentally being run on not Windows PE systems
CALL :IsWinPE
IF %ERRORLEVEL% EQU 0 (
ECHO [TS] ERROR: This Task Sequence must be run under Windows PE.
PAUSE
GOTO END
)

:: == Create partitions ==
:: Windows 10 UEFI target
(
:: These commands are used with DiskPart to create four partitions ^
   for a UEFI/GPT-based PC. ^
   ** Adjust the partition sizes to fill the drive as necessary
ECHO select disk %TARGET_DISK%
ECHO clean
ECHO convert gpt
:: == 1. EFI System Partition (ESP) ================
ECHO create partition efi size=499
ECHO format quick fs=fat32 label="System"
ECHO assign letter="S"
:: == 2. Microsoft Reserved (MSR) partition ========
ECHO create partition msr size=128
:: == 3. Windows partition ========================= ^
   == 3.a. Create the Windows partition =========
ECHO create partition primary
:: == 3.b. Create space for the recovery tools == ^
   ** Update this size to match the size of the recovery tools (winre.wim) ^
      plus some free space.
ECHO shrink minimum=2038
:: == 3.c. Prepare the Windows partition ========
ECHO format quick fs=ntfs label="Windows"
ECHO assign letter="W"
:: == 4. Recovery tools partition ==================
ECHO create partition primary
ECHO format quick fs=ntfs label="Recovery tools"
ECHO assign letter="R"
:: Set Recovery flag
ECHO set id="de94bba4-06d1-4d40-a16a-bfd50179d6ac"
:: Set as required partition by system and prevent assigning drive letter automatically
ECHO gpt attributes=0x8000000000000001
ECHO list volume
ECHO exit
) | diskpart

:: Alternative to the above in-file parameters
:: diskpart /s %TS_DIR%\%DPCF%

:: We must implement a delay of 15 sec after diskpart
CALL :Delay 15

:: == Set high-performance power scheme to speed deployment ==
CALL powercfg /s 8c5e7fda-e8bf-4a96-9a85-a6e23a8c635c

:: == Apply the image to the Windows partition ==
ECHO Starting Apply-Image...
dism /Apply-Image /ImageFile:%IMG_DIR%\%IMG_FILE% /Index:1 /ApplyDir:W:\

:: == Copy boot files to the System partition ==
W:\Windows\System32\bcdboot W:\Windows /s S:

:: == Copy the Windows RE image to the
::    Windows RE Tools partition ==
md R:\Recovery\WindowsRE
xcopy /h W:\Windows\System32\Recovery\Winre.wim R:\Recovery\WindowsRE\

:: == Register the location of the recovery tools ==
W:\Windows\System32\Reagentc /Setreimage /Path R:\Recovery\WindowsRE /Target W:\Windows

:: == Verify the configuration status of the images. ==
W:\Windows\System32\Reagentc /Info /Target W:\Windows

:END
ECHO "Restarting in..."
:: timeout /t 15
CALL :Delay 15
Wpeutil Reboot
EXIT /B %ERRORLEVEL%
:: ===== The Script ends here ===//

:::::::::: LIBRARY FUNCTIONS :::::::::::::::::::

::: Delay <IN_SECS> :::::::::::::::::::::::::::::::\\
:Delay
IF NOT EXIST %SYSTEM32%\timeout.exe GOTO STARTCMDTIMER
timeout /t %~1
EXIT /B 0
:STARTCMDTIMER
SETLOCAL EnableDelayedExpansion
SET /A delay=%~1-1
FOR /f %%a in ('copy /Z "%~f0" nul') do set "Newline=%%a"
FOR /L %%i IN (%delay%,-1,0) DO (
SET /p "= Delay          !Newline!" <NUL
SET /p "= Delay %%is!Newline!" <NUL
ping -n 1 -w 1000 192.168.255.0 > NUL
)
ECHO:
SETLOCAL DisableDelayedExpansion
EXIT /B 0
::: Delay <IN_SECS> ::::::::::::::::::::::::::::::://

::: IsWinPE <> :::::::::::::::::::::::::::::::::::\\
:IsWinPE
REG QUERY HKEY_LOCAL_MACHINE\SYSTEM\ControlSet001\Control\MiniNT\ 1> NUL 2>&1
IF %ERRORLEVEL% NEQ 0 (
EXIT /B 0
)
ECHO:
EXIT /B 1
::: IsWinPE <> ::::::::::::::::::::::::::::::::::://
| Warning ! |
|---|
| The former script uses diskpart which could potentially wipe a disk without requiring any confirmation. The script prevents being run in other than Windows PE environments but you still must be extremely cautious if you decide to edit/debug etc. |
Let's copy the task sequence script file to:
C:\SERVA_REPO\WIA\WDS\WinPE_64\TaskSequeces\Image_Deployment.cmd
5.2 Full Flash Update (FFU) Capture & Deploy
DISM in Windows 10 version 1709 and up supports the Full Flash Update (.FFU) format. Unlike the file-based WIM format, FFU is a sector-based file container that stores a whole disk. When using FFU images files you can capture and deploy a single file image of a physical drive, including Windows, Recovery, and System partition information all at once.
This method allows:
1) Deploy an image to different size of hard drive but always larger or equal than the drive it is captured from. All partition sizes will be kept unaltered.
2) Reliable deployments; a hash table is generated during capture, and validated when applying the image.
3) Modify the captured images with Dism.exe
4)
Fast process (really fast); ideal for capturing and deploying Windows on a factory floor.
5)
It creates larger images (about +25%)
For Task Sequence examples on this mode please see the corresponding examples (Capture_ffu_SurfaceProX.cmd & Deployment_ffu_SurfaceProX.cmd) at PXE/BINL - AN06: Windows Network Image Capture & Deploy on ARM
5.3 Netboot a client
5.3.1 Image Capture:
Netboot a Reference PC (which must be previously sysprep'ed), start our "Capture & Deploy" asset from Serva's menu, and run the Image_Capture.cmd task sequence.
| Note |
|---|
| If you plan to deploy only targeting the reference PC you can avoid Sysprep. |
5.3.2 Image Deploy:
Netboot the target PC, start our "Capture & Deploy" asset from Serva's menu, and run the Image_Deployment.cmd task sequence.

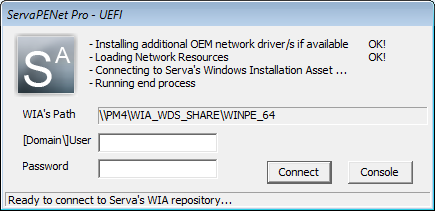
Fig 1: ServaPENet login to Serva's repository (WIA_WDS_SHARE)

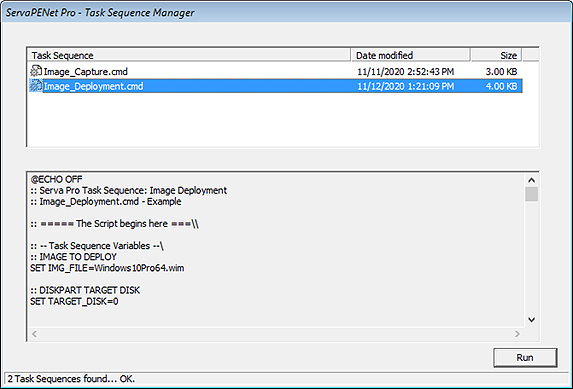
Fig 2: ServaPENet Task Sequence Manager
| Notes |
|---|
|
5.4 Source of captured Images.
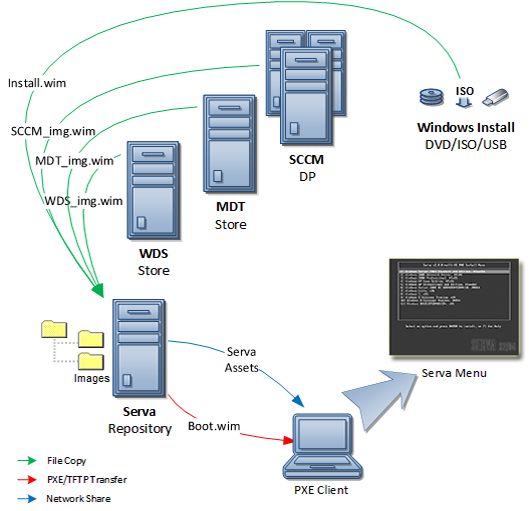
A deployment task sequence (i.e. Image_Deployment.cmd) can deploy not only images previously captured by a Serva task sequence (i.e. Image_Capture.cmd) but also images captured using WDS, MDT, SCCM and images contained in Install DVDs, ISOs or USB drives.

Fig 3: Deployment of images captured by WDS/MDT/SCCM and contained in Install DVD/ISO/USB Drive
It only takes copying the WIM images under the \Images directory and invoking them from the corresponding deployment task sequence.
| Note |
|---|
| With this method you can remotely net deploy WDS/MDT/SCCM images without requiring the services of active WDS/MDT/SCCM servers. |
| Warning |
|---|
| If you plan using the Microsoft Media Creation Tool please download ISOs containing a single version and architecture of Windows. The created ISOs will contain Install.esd files that must be converted to Install.wim files with DISM before deployment. |
5.5 Additional Reading:
Capture and Deployment tasks are strongly dependent on Dism.exe. A clear understanding of this Microsoft tool is a must if we really want to excel at this topic.
DISM Unattended Servicing Command-Line Options
Learn How to Sysprep Capture Windows 10 Image using DISM
6 Automation
6.1 Automating repository login in ServaPENet can done i.e. by creating
C:\SERVA_REPO\WIA_WDS\WinPE_64\$OEM$\$Boot$\$1\Unattend.ini
as explained in
PXE/BINL - AN02: Windows Network Install (Adv) & WinPE Boot
6.2 Automating ServaPENet Task Sequence selection can be done by editing ServaAsset.inf and defining the EndProcess variable as the path to the task sequence to be automatically run i.e.
[PXESERVA_MENU_ENTRY]
asset = Capture & Deploy

[SERVAPENET]
EndProcess = P:\TaskSequences\Image_Deployment.cmd
In this case after login the Task Sequence Menu is not displayed and the indicated task sequence will start running immediately.
7 Advanced
So far we have learned how to Capture & Deploy a PC image by net booting with Serva a Windows PE executive. Serva sorts things in a way that when the Windows PE boots up will automatically:
- Launch ServaPENet
- Activate network services
- Connect to Serva repository
- Map the booted asset's Head Directory to the Windows PE drive P:
- Run the Task Sequence Manager as the End Process
- The user then can select and run one of the available task sequences.
All of the above can be done by just adding the following stanza to the [SERVAPENET] section of the corresponding ServaAsset.inf
[SERVAPENET]
EndProcess = *TaskSeqSelector
But we can also do more things:
7.1 An application might need a different letter than P: pointing to the asset's Head Directory i.e.
[SERVAPENET]
DeviceName = G:
7.2 Running a local executable i.e.
[SERVAPENET]
EndProcess = X:\Windows\System32\Notepad.exe
EndProcessParams = X:\Serva.txt
| Note |
|---|
| On the net booted Windows PE X: points to the root of the booted Windows PE Environment. |
7.3 Running a remote executable i.e.
[SERVAPENET]
EndProcess = P:\Bin\xxxx.exe
EndProcessParams = -x -y -z
| Note |
|---|
| On the net booted Windows PE P: (by default) points to the net booted asset Head Directory on Serva's repository. |
7.2 and 7.3 can be used for net booting non-PXE friendly Windows PE based tools even if they use external components.
7.4 Preventing ServaPENet login errors 0x4CF, 0x35, etc. These errors are sometimes related to network drivers not signaling that they are not ready to use when Serva attempts the repository login. ServaPENet 4.0.0 implements a small default delay before login but some drivers might need a longer value. defaults:
[SERVAPENET]
#default values in mS
BIOS_LoginDelay = 800
UEFI_LoginDelay = 1200
BIOS_UnattendLoginDelay = 2200
UEFI_UnattendLoginDelay = 4200
8 Troubleshooting
8.1 Troubleshooting Capture task sequence errors (Image_Capture.cmd).
8.1.1 [TS] ERROR: User does not have Writing Rights in Serva's repository.
Capture task sequences are meant to save the captured image file at Serva's repository, for that reason when we login with ServaPENet we must use an user with Writing Rights on WIA_WDS_SHARE.
8.1.2 [TS] ERROR: Couldn't find OS Partition/Volume labeled "Windows".
8.1.2.1 Our Capture task sequence example (Image_Capture.cmd) expects to find the Windows partition being captured labeled as "Windows". If your Windows partition being captured is labeled differently in your reference PC (i.e. "Local Disk") please edit the task sequence variable WINVOLUMELABEL accordingly:
:: -- Task Sequence Variables --\
:: SET THE LABEL OF THE WINDOWS PARTITION BEING CAPTURED HERE
SET WINVOLUMELABEL="Windows"
:: -- Task Sequence Variables --\
:: SET THE LABEL OF THE WINDOWS PARTITION BEING CAPTURED HERE
SET WINVOLUMELABEL="Local Disk"
In order to know the Label of the OS volume on a target PC we can just open a console as soon as the client is booted and ServaPENet is active then type:
X:> diskpart
DISKPART> select disk 0
DISKPART> list volume

   Volume ###  Ltr Label        Fs     Type        Size     Status   Info
   ----------  --- -----------  -----  ----------  -------  -------- -------
   Volume 0     C  Local Disk   NTFS   Partition    118 GB  Healthy
   Volume 1        Windows RE   NTFS   Partition    410 MB  Healthy
   Volume 2        SYSTEM       FAT32  Partition    260 MB  Healthy  Hidden

DISKPART> exit
X:>
In this example (MS Surface Pro X 128GB) the volume containing the OS is not labeled "Windows" but "Local Disk" instead.
8.1.2.2 Our Capture task sequence example (Image_Capture.cmd) expects to find the Windows PE assigned Windows volume letter (i.e.) "C" by using the task sequence function GetVolumeLetter, if this function fails we can alternatively setting it manually.
:: == Find Windows volume letter ==
CALL :GetVolumeLetter WINVOLUMELETTER %TARGET_DISK% %WINVOLUMELABEL%
IF %ERRORLEVEL% NEQ 0 (
ECHO [TS] ERROR: Couldn't find OS Volume labeled %WINVOLUMELABEL%.
PAUSE
GOTO END
)
:: Alternative Manual definition
::SET WINVOLUMELETTER=C
:: == Find Windows volume letter ==
::CALL :GetVolumeLetter WINVOLUMELETTER %TARGET_DISK% %WINVOLUMELABEL%
::IF %ERRORLEVEL% NEQ 0 (
::ECHO [TS] ERROR: Couldn't find OS Volume labeled %WINVOLUMELABEL%.
::PAUSE
::GOTO END
::)
:: Alternative Manual definition
SET WINVOLUMELETTER=C
8.1.2.3 If after considering 8.1.2.1 and 8.1.2.2 the Capture Task Sequence still fails when invoking the dism line we might be trying to image a Windows volume created with a special flag (noDefaultDriveLetter) preventing the booting Windows PE executive from assigning it a letter.
This has been observed in Server 22 and Win11 24H2/LTSС 2024.
In this case just opening a console as soon as the client is booted and ServaPENet is active we can see the missing Volume letter by typing:
X:> diskpart
DISKPART> select disk 0
DISKPART> list volume

   Volume ###  Ltr Label        Fs     Type        Size     Status   Info
   ----------  --- -----------  -----  ----------  -------  -------- -------
   Volume 0        Local Disk   NTFS   Partition    118 GB  Healthy
   Volume 1        Windows RE   NTFS   Partition    410 MB  Healthy
   Volume 2        SYSTEM       FAT32  Partition    260 MB  Healthy  Hidden

DISKPART> exit
X:>
We can also see this by obtaining the partition attributes.
X:> diskpart
DISKPART> select disk 0
DISKPART> select partition 3
DISKPART> detail partition

Partition 0
Type    : ebd0a0a2-b9e5-4433-87c0-68b6b72699c7
Hidden  : No
Required: No
Attrib  : 0X8000000000000000
Offset in Bytes: 122683392

   Volume ###  Ltr Label        Fs     Type        Size     Status   Info
   ----------  --- -----------  -----  ----------  -------  -------- -------
   Volume 0     C  Local Disk   NTFS   Partition    118 GB  Healthy

DISKPART> exit
X:>
Attrib beginning with 0X80 indicates the partition was created with the flag noDefaultDriveLetter.
We can fix this by removing the mentioned flag.
X:> diskpart
DISKPART> select disk 0
DISKPART> select volume C:
DISKPART> attributes volume clear nodefaultdriveletter

DISKPART> exit
X:>
8.2 Troubleshooting Deployment task sequence errors (Image_Deployment.cmd).
8.2.1 [TS] ERROR: This Task Sequence must be run under Windows PE.
The Deployment task sequence uses diskpart which could potentially wipe a disk without requiring any confirmation. The script prevents being run in other than Windows PE environments.
8.2.2 Target PC does not properly boot after a deployment without errors
- Please verify that the captured image correspond to a bootable Windows partition, you can do that by i.e. opening the image WIM file with 7-zip and see the image content.
If the image was captured using our Image_Capture.cmd remember this task sequence expects to find the Windows partition being captured labeled as "Windows"; If your Windows partition being captured is labeled differently please read 8.1.2
- The deployment task sequence Image_Deployment.cmd by default sets the target hard disk in GPT mode, if later the target PC is booted in Legacy mode it won't be able to boot. In this case booting the target in UEFI mode solves the problem.
9 Final words
The discussed Serva PXE/BINL advanced techniques represent one more step in the road to master the different Microsoft Windows network boot/install/capture/deploy scenarios. Users can now easily perform Capture and Deployment of OS images.
If you are a Serva Community user and you find it useful please consider purchasing Serva Pro. Non-personal or commercial use of Serva always requires a Serva Pro license (see Serva's download page for further details).
Serva bugs, comments, or ideas on how to improve the information contained in this document please contact us here.
| Updated | 01/10/2025 |
| Originally published | 11/20/2020 |
