JeOSS U LTS 8.04.3 R1 Install Manual
Jeoss Linux is a compact server oriented distribution (Ubuntu/Debian based) made directly-installable even on legacy, limited resource, and embedded x86 platforms. Please read /jeoss.eula before installing Jeoss.
PART I - Pre Install Considerations.
1) Introduction
Jeoss has a very flexible install system allowing (among other things) direct installation on headless and/or CD-less targets. In all cases the install process can be completely controlled from start to finish by a single (Secure Shell) SSH, Serial, or Physical console session.
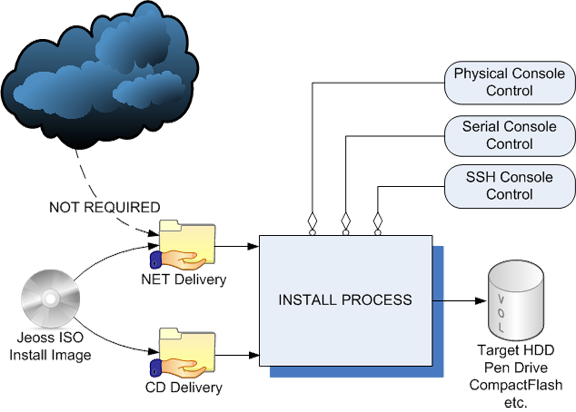
Fig-1
The Jeoss Install Process running in the target is always sourced from a unique Jeoss ISO Install Image. This image content can reach target's RAM either by a CD Boot Delivery action (or its emulation) or alternatively by a NET Boot Delivery action. In both cases the objective is always the same; to transport the installer required files from its ISO image to target's memory for their processing.
Since Jeoss Install initially becomes alive the whole process can be managed either from a Physical, Serial, or SSH controlling console.
NOTE: This slightly different terminology presented here tries to avoid ambiguities like calling a "NET install" a CD Boot image delivery when controlled by a network connected SSH console...
Please Take a minute to understand Fig-1 before continuing.
2) Jeoss Install Requirements
2.1) Install Process
The target must run a Pentium CPU or better (not PAE req) with at least 128 megabytes of RAM.
The target should have space on its hard disk to create a new disk partition of at least 210 megabytes for a minimal server installation. You'll need more disk space to install additional packages, depending on what you wish to do with your new Jeoss system. Jeoss full install requires 490 MB.
2.2) CD Boot Delivery
It requires a CD-reader and the target's capability of booting from it.
2.3) NET Boot Delivery
2.3.1) It requires a target with a PXE capable network card.
2.3.2) The Jeoss install ISO image has to be offered from an auxiliary HTTP server.
2.3.3) The Jeoss install ISO image directory "/install" has to be offered from an auxiliary TFTP server.
2.3.4) The target requires a dynamic IP address assigned from an auxiliary DHCP server with option "boot file" = pxelinux.0
2.4) Physical Console Control
It requires a target with installed video card, monitor, and keyboard.
2.5) Serial Console Control
It requires a target with an RS232 port plus an auxiliary computer running a serial terminal emulator
2.6) SSH Console Control
2.6.1) It requires a target with network card
2.6.2) The target needs a dynamic IP address assigned from an auxiliary DHCP
2.6.3) It requires an auxiliary computer running an SSH client SSH Console login user: installer password: jeoss
NOTE 1: Jeoss Install Process does not require Internet connection at any time.
NOTE 2: All the possible combinations of Image Delivery (CD boot Delivery/ NET Boot Delivery) and Install Control alternatives (Physical/Serial/SSH Console) are valid options.
3) Setting up a NET Boot Delivery environment (PXE)
Right after power up, the target's PXE enabled network card will broadcast a DHCP IP request. A DHCP server will have to assign a valid IP address and provide the name of a PXE NET booting file (pxelinux.0) along with the IP address of the TFTP server that offers it.
Next step the target will require to the TFTP server pxelinux.0 and its associated auxiliary and configuration files.
At this point either a Physical or Serial Console attached to the target will be able to display Jeoss Install first screen (in this case NET delivered):
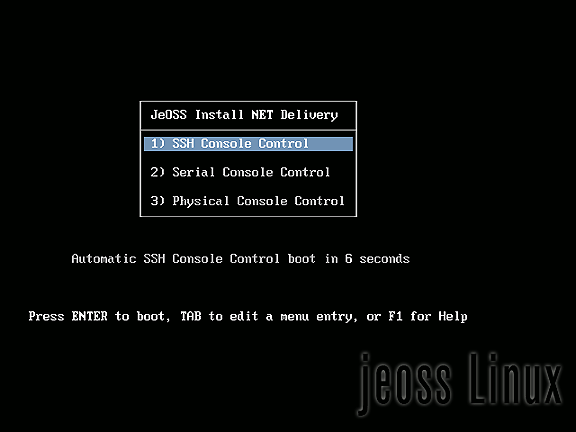
Fig-2
From this point it is possible to continue the NET Image delivery just by manually selecting the appropriate Serial or Physical Console Control option. If there is no any human interaction after 7 seconds Jeoss Install will automatically launch the SSH Console server. When this happens the install process can be only continued by pointing an SSH client to the target's DHCP assigned IP address.
Next the process will ask the Name or IP address of the HTTP server which offers the whole body of Jeoss install image in order to start the file retrieving.
A NET Boot Delivery environment (PXE) minimally requires DHCP, TFTP, and HTTP server services. Optionally it can also benefit from TFP, DNS, NTP, SNTP, and SYSLOG server services.
For an easy MS Windows NET Boot Delivery setup get a free copy of Serva32/64
at http://www.vercot.com/~serva/
4) About SSH Console Control
The idea of the SSH Console Control is being able to use an SSH Client but without any help of Serial/Physical consoles at any point of the installation. This way we can directly install Jeoss on a headless and CD-less target without requiring a Serial Console.
We already described on the former point the SSH Console Control when using Net Boot Delivery. In the case of requiring SSH Console Control while using CD Boot Delivery the services of a DHCP server will be required in order to assign the target's IP address.
It is important to consider that the SSH service takes about 1.5 minutes to get ready on a Geode 500MHz, during this time we might be "blind" if the target does not have a physical console. Therefore any SSH Client login attempt before the SSH at the target is ready will be unsuccessful.
If you use SSH Console Control please remember the mentioned delay.
SSH Console login:
user : installer
password: jeoss
5) About Serial Console Control
Jeoss Install Serial Console Control is set at 115200 bps by default. This value cannot be changed on a CD Boot delivery without re-mastering Jeoss installation image.
On a NET Boot Delivery nevertheless, it is very easy to dynamically use different serial console baud rates by assigning the target one of the following special IPs:
| DHCP Assigned IP | Serial Console |
|---|---|
| 192.168.20.240 | 2400 bps n8 |
| 192.168.20.241 | 4800 bps n8 |
| 192.168.20.242 | 9600 bps n8 |
| 192.168.20.243 | 19200 bps n8 |
| 192.168.20.244 | 38400 bps n8 |
| 192.168.20.245 | 57600 bps n8 |
| Any other IP | 115200 bps n8 |
6) About IPs
It is pretty easy setting up Jeoss Install network environment with the help of an XP/Vista/7 PC running Serva32/64 (HTTP/FTP/TFTP/DHCP/DNS/SNTP/SYSLOG server).
A typical setup would be:
Serva32/64 IP : 192.168.20.1
DHCP offer pool : 192.168.20.10-30
if we need Serial Console Control with different than default Baud Rate then let's force the DHCP server to assign the special addresses mentioned above.
In case we want to set-up a PXE network environment but we have no control over the already working DHCP server we'll need the services of a "Proxy DHCP".
Serva32/64 can also work as a "Proxy DHCP".
PART II - Jeoss Install Process
7) Introduction
Jeoss Install Process is a customized version of Ubuntu/Debian Install focused on:
7.1) Unique install image:
All the possible different install scenarios are sourced from a unique ISO image.
7.2) Small Size:
Less than 10 MB.
7.3) Image Delivery - Install Control independence:
No matter which delivery or control we use Jeoss Install will look the same with minimal differences.
7.4) Internet independence:
Ubuntu & Debian "Net install" depends on Internet; their ISO images cannot be the source of a NET Boot delivery. Jeoss Install instead achieves full Internet independence using its own install image as repository.
People with minimum Ubuntu/Debian install experience will navigate Jeoss Install
without being required any additional effort.
8) Jeoss Install Process times
| Full CD boot delivery on: | Full NET boot delivery on: |
|---|---|
| CPU: Intel Core2 Duo 2.2GHz | CPU: AMD Geode 500 MHz |
| RAM: 4GB | RAM: 256 MB |
| HDD: 500GB 7200RPM | HDD: Compact-Flash 2GB 45x (7 MBps) |
| 8 Minutes | 38 Minutes |
9)Jeoss Install special screens
On this section we mention Jeoss Install instances that might require special
attention.
9.1) Install Mode
The second screen of a Jeoss Install
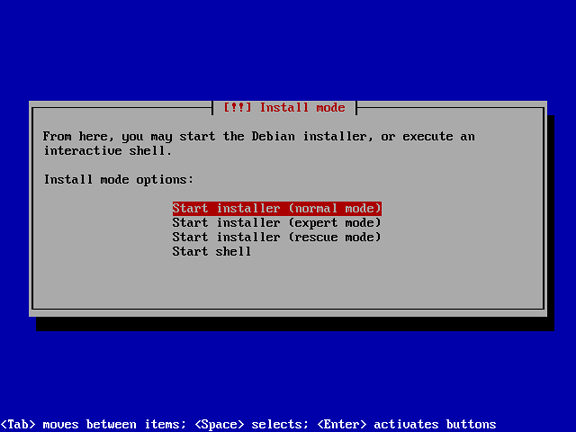
Fig-3
On this screen we decide the install mode we want:
Normal: The install process will ask the installer the minimum set of absolutely required questions.
Expert: The install process will allow the maximum flexibility on changing parameters during install. It is also available the option of running a text console on every step install takes in order to control and tune the whole process. "Only for experts".
Rescue: Allows mounting an already installed partition in order to fix it. This mode is also available while under SSH Console control, what implies being able to have access to a non booting system on a headless and CD-less server without needing a serial console)
Shell: It launches a shell console.
9.2) Mirror Selection
On a NET Boot Delivery Jeoss install needs to know from where the Jeoss install
ISO is being HTTP offered. we'll get:
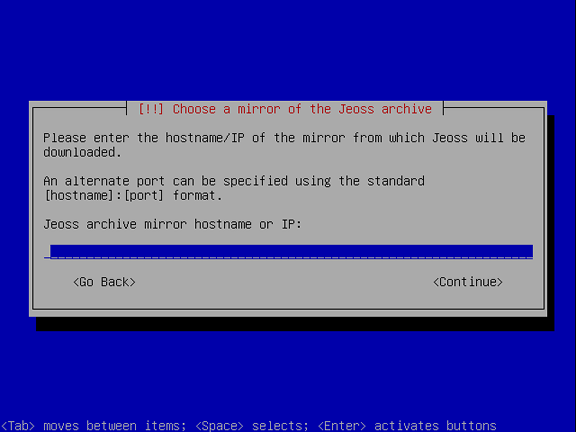
Fig-4
We can provide the IP of our local HTTP server or its name if we have set-up
a DNS service. Providing IPs leads to a faster NET Boot Delivery.
The next screen will require the directory in which the mirror of the Jeoss
archive is located.
9.3) Software Selection
Right after the Jeoss core system gets installed we will be invited to add
different packages or package collections targeting diverse server
functionalities.
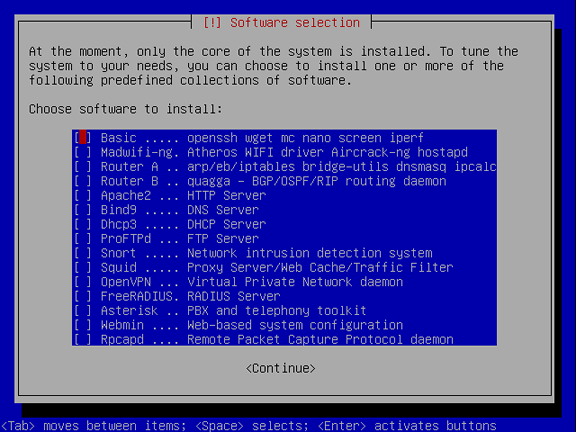
Fig-5
We can select the required items and continue.
NOTE: There are situations where the default installation of 2 or more items can lead to an error on the next boot. i.e. Dhcp3 and dnsmasq (from Router A) are both DHCP servers, if both daemons try to take the same network interface there will be a conflict. In the case you really need both programs working together it will require post-install configuration.
9.4) Boot Loader
After installing the optional packages it is Boot Loader (GRUB) turn. If your install involves just one HDD GRUB gets installed no questions asked. But (i.e.) if you just NET booted a SBC (single board computer) which already has a working Jeoss on its Compact-Flash but your intention is installing a new Jeoss copy let say on a Pen Drive connected to the SBC's USB port the installer will ask you:
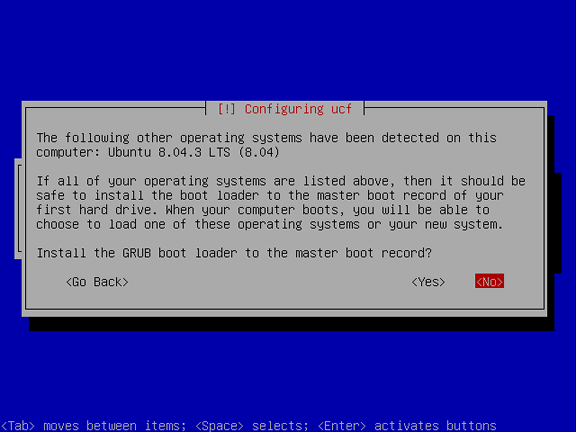
Fig-6
Be careful, you might already have the GRUB's boot loader installed on your first hard drive and you do not want changes there. In our case if we are installing not in the first hard drive the answer should be < NO >
NOTE: Remember the HDD order on a PC can change when we add a new device. The Partition Manager instance is the install tool where we can safely identify drives and partition. It is always handy saving Partman screens for future reference.
If you answered < NO > to the previous screen then the installer will ask you
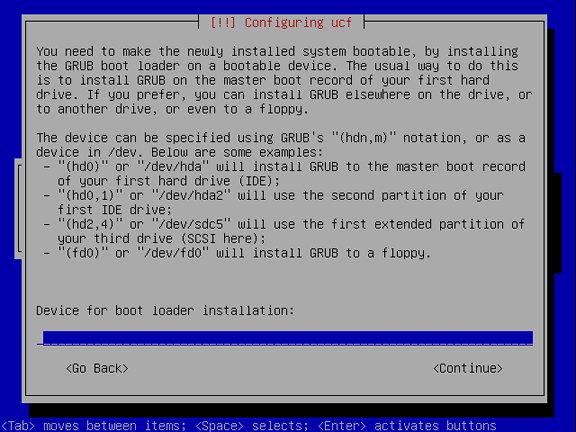
Fig-7
In our example we have to answer the physical location where our Jeoss is being installed; we decided that some steps before when we partitioned our HDD.
9.5) Flash Memory support
Jeoss tries hard for being Flash "friendly" that's why we will be asked:
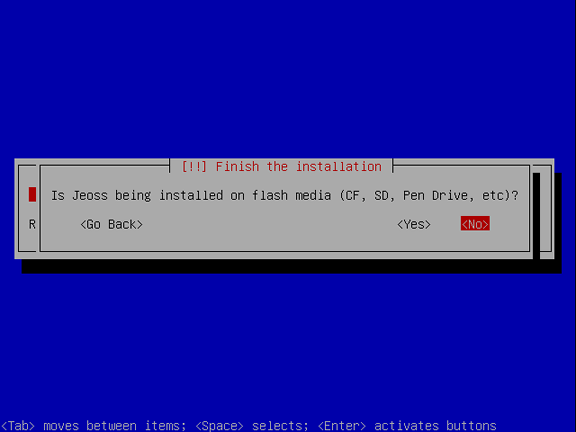
Fig-8
By answering <Yes> Jeoss Install will act on partition parameters and will mount certain log areas on RAM disk locations in order to avoid unnecessary Flash writing. You are encouraged to see and improve what Jeoss does for protecting your Flash memory devices by inspecting /etc/fstab. Please understand it is user responsibility evaluating there are no installed programs abusing of user's flash devices.
NOTE 1: When you install Jeoss on Flash please do not define SWAP partitions. This implies not using the automatic partitioner but the manual option of it instead.
NOTE 2: Relocating certain log files to RAM disk makes them inexistent on start-up; this leads to certain inoffensive error message when Jeoss boots-up.
9.6) Moving Target Image
Again, this is a question that shows up only if you install Jeoss on a Target with more than one HDD
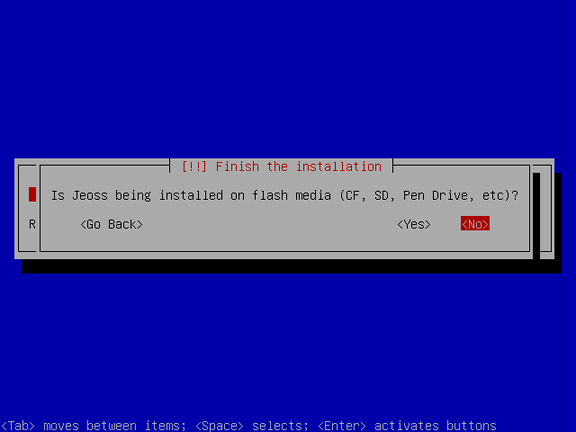
Fig-9
Let say we installed Jeoss and its GRUB boot loader on sdb (hd1,0) (removable flash device). When booting from it on some other PC the system will assign it sda (hd0,0), then the entries on /boot/grub/menu.lst and /boot/grub/device.map have to be modified accordingly for booting without errors. Saying < Yes > those modifications are done automatically.
NOTE: Grub is famous for being a bit temperamental when it comes to deal with these issues. Therefore it is not unexpected that you might need to make some post install adjustment on /boot/grub/menu.lst and /boot/grub/device.map when the HDD aspect of the install process goes out of the ordinary.
9.7) Serial Console
After re-boot you might want to have the additional option of controlling your new Jeoss system from a Serial Console
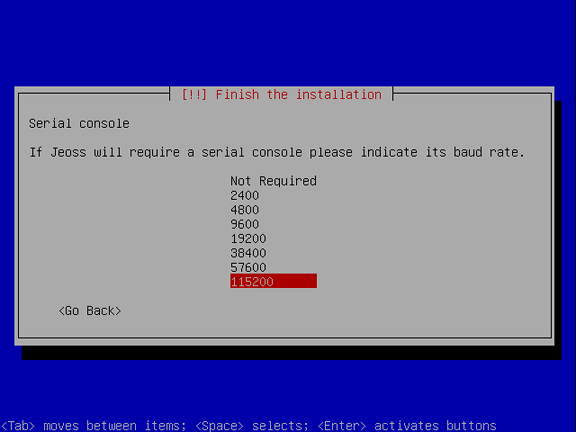
Fig-10
Please tell Jeoss Install the required Serial Console Baud Rate
NOTE: This Baud Rate is totally independent from the one used during a Serial Console controlled Install.
9.8) Additional Static IP
In the case we opted for a NET Boot Delivery or a CD Boot Delivery controlled by SSH Console, the Target's IP address during install has been assigned by a DHCP server that might not be available after re-boot. That is the reason for this offer.
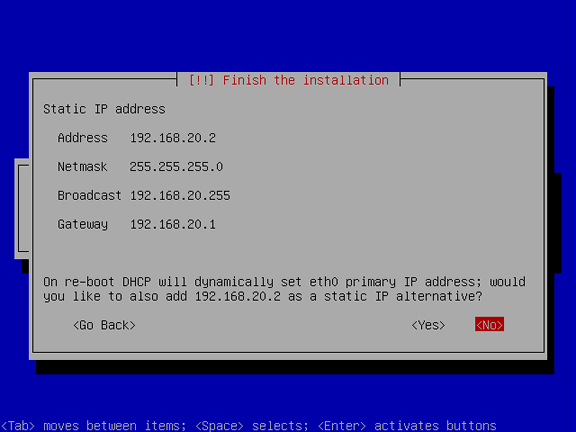
Fig-11
The suggested address is fixed, that's why we mentioned 192.168.20.0 as a good network alternative for Jeoss installation. After re-boot, even without DHCP, you can easily SSH your new Jeoss box on 192.168.20.2.
10) About Optional Software
10.1) Basic ..... openssh wget mc nano screen iperf
Jeoss Basic Package; Openssh, Network Downloader, File Manager, Editor, and Terminal Multiplexer.
10.2) Madwifi-ng. Atheros WIFI driver Aircrack-ng hostapd
Installs Atheros driver & tools, auditing wireless network tool set, wireless authentication daemon.
10.3) Router A .. arp/eb/iptables bridge-utils dnsmasq ipcalc
Jeoss Basic Bridging/Routing collection with arptables, ebtables, iptables, bridge-utils, dnsmasq, and ipcalc.
10.4) Router B .. quagga - BGP/OSPF/RIP routing daemon
Quagga; Software which manages TCP/IP based routing protocols. It supports BGP4, BGP4+, OSPFv2, OSPFv3, IS-IS, RIPv1, RIPv2, and RIPng as well as their IPv6 versions.
10.5) Apache2 ... HTTP Server
Apache HyperText Transfer Protocol (HTTP) server
* Jeoss Apache2 comes pre-configured working out-of-the-box. When install finishes you get a working Apache2 system. Just point your HTTP client to Jeoss box IP address and use it. Configuration steps after re-boot on your new Jeoss home page.
10.6) Lighttpd .. HTTP Server
Lighttpd HyperText Transfer Protocol (HTTP) server
* Jeoss Lighttpd comes pre-configured working out-of-the-box. When install finishes you get a working Lighttpd system. Just point your HTTP client to Jeoss box IP address and use it.
10.7) Bind9 ..... DNS Server
The Berkeley Internet Name Domain (BIND) implements an Internet domain name server. BIND is the most widely-used name server software on the Internet, and is supported by the Internet Software Consortium, www.isc.org
10.8) Dhcp3 ..... DHCP Server
Version 3 of the Internet Software Consortium's implementation of DHCP
10.9) ProFTPd ... FTP Server
Powerful and versatile File Transfer Protocol (FTP) server program. The ProFTPD config file is very similar to Apache's config file.
* Jeoss ProFTP comes pre-configured working out-of-the-box. When install finishes you get a working ProFTP system. Just point your FTP client to Jeoss box IP address and use it.
To adjust ProFTP to your needs just configure /etc/proftpd/proftpd.conf
Jeoss also installs the following configuration templates.
/etc/proftpd/proftpd.conf.basic
/etc/proftpd/proftpd.conf.anonymous
/etc/proftpd/proftpd.conf.virtual
10.10) Snort ..... Network intrusion detection system
Network intrusion detection system. Plain-vanilla Snort distribution without database support.
10.11) Squid ..... Proxy Server/Web Cache/Traffic Filter
Internet Object Cache developed by the National Laboratory for Applied Networking Research (NLANR)
10.12) OpenVPN ... Virtual Private Network daemon
Implements virtual private network (VPN) solutions for creating secure point-to-point or site-to-site connections in routed or bridged configurations and remote access facilities
10.13) FreeRADIUS. RADIUS Server
RADIUS is a network protocol that provides centralized Authentication,
Authorization, and Accounting (AAA) management for computers to connect and use a network service
10.14) Asterisk .. PBX and telephony toolkit
Software implementation of a telephone private branch exchange (PBX), it allows attached telephones to make calls to one another, and to connect to other telephone services including the public switched telephone network (PSTN) and Voice over Internet Protocol (VoIP) services.
* Jeoss Asterisk comes pre-configured working out-of-the-box. When install finishes you get a working Asterisk system. Just point your IP phones (i.e. X-Lite) to Jeoss box IP address and use the following pre-configured
dial plan:
| Sip login |
Sip password |
Extension # |
Voice Mail retrieval # |
Voice Mail password |
|---|---|---|---|---|
| bgates | 1234 | 251 | 444 | 4321 |
| sjobs | 1234 | 252 | 444 | 4321 |
| ltorvalds | 1234 | 253 | 444 | 4321 |
Extension 250 introduces Asterisk system.
Just modify the supplied dial plan to fulfill your needs, add your hardware FXO/FXS cards if required (driver included) and you are ready to go.
NOTE: Back up of original Asterisk configuration files are kept for reference at:
/etc/asterisk/sip.conf.borg
/etc/asterisk/extensions.conf.borg
/etc/asterisk/extensions.ael.borg
/etc/asterisk/voicemail.conf.borg
/etc/asterisk/asterisk.conf.borg
10.15) Webmin .... Web-based system configuration
A program that simplifies the process of managing a Linux system through an easy-to-use web interface.
* Jeoss Webmin comes pre-configured working out-of-the-box. When Install finishes you get a working Webmin system. Just point your Internet browser to you Jeoss Box IP (i.e. 192.168.20.2) https://192.168.20.2:10000/ and you get Webmin administration up and running.
10.16) Rpcapd .... Remote Packet Capture Protocol daemon
Rpcapd allows remote traffic capture for Wireshark real-time analysis
* After reboot lets convert our Jeoss box (1 Ethernet + 1 Atheros WIFI) into a WIFI traffic analyzer by capturing some WIFI unauthenticated traffic including 802.11 management and control packets.
a) On our Jeoss Box
#let's stop our Atheros WIFI card
sudo airmon-ng stop ath0
# let's start the card in monitor mode on channel 6 (just to focus our capture
# on one channel)
sudo airmon-ng start wifi0 6
# let's start our capture daemon for communicating with Wireshark on Jeoss box
# Ethernet interface IP 192.168.20.2
sudo rpcapd -b 192.168.20.2 -n
b) On our PC
# let's run Wireshark on our PC connected to Jeoss Box on 192.168.20.2
let's set Wireshark Interface Capture/options
--interface --192.168.20.2 --rpcap://[192.168.20.2]/ath0
#let's start capturing WIFI traffic on channel 6
NOTE: rpcapd is a good tool for troubleshooting our server traffic but using it on a production server could lead to a security breach when a remote un-authenticated computer receives the traffic of our server ports.
JeossInstall.txt v1.01
(c) 2009-2010 Patrick Masotta
